Instagram Feed Documentation
How to setup and use Instagram Feed on your site
Found an issue or a problem that you can't find an answer for? Create an issue in our Premium Issue Tracker.
Before you start
Before you can install a Premium Plugin, you are required to have the License Manager plugin installed. It is a free plugin available in GPM and can be installed like any other through the Plugin section of the admin plugin, or via command line.
$ bin/gpm install license-managerInstallation
First ensure you are running the latest version of Grav 1.7 (-f forces a refresh of the GPM index).
$ bin/gpm selfupgrade -fThe Lightbox Gallery requires the shortcode-core plugin as a dependency, even though the shortcode syntax is optional. These are available via GPM, and because the plugin has dependencies you just need to proceed and install the Lightbox Gallery plugin, and confirm when prompted to install the others:
$ bin/gpm install instagram-feedYou can also install the plugin via the Plugins section in the admin plugin.
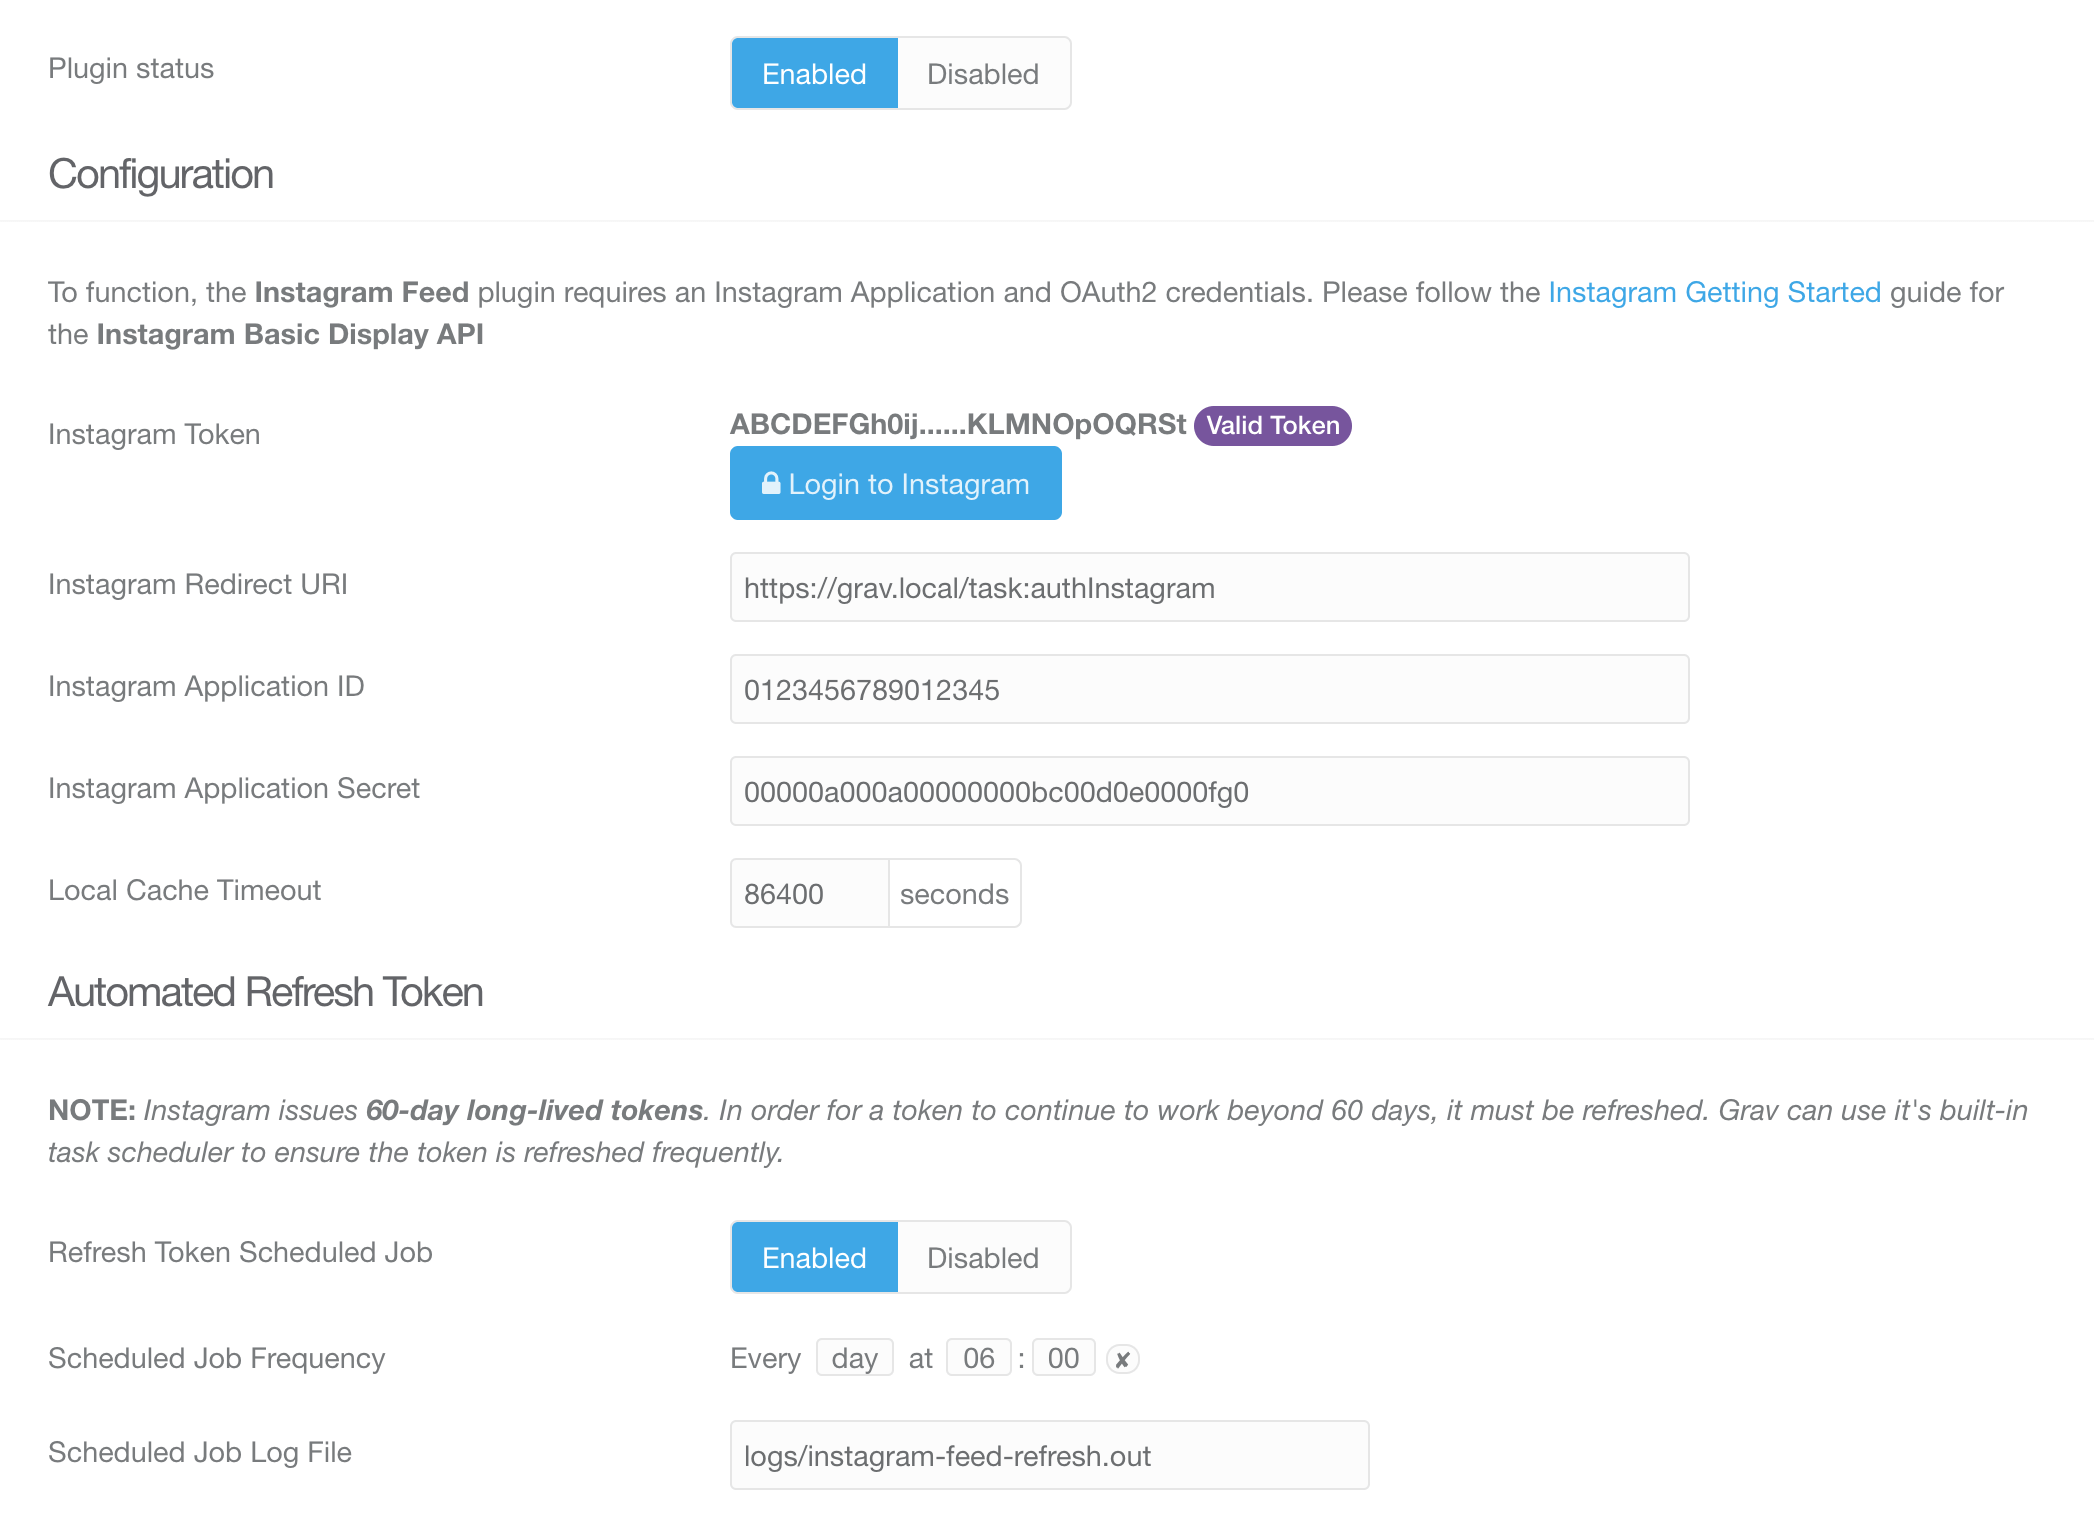
Configuration
The simplest way to configure the plugin is via the Admin by navigating to Plugins then clicking on the Lightbox Gallery plugin entry. The available options are:
-
Plugin status → Will enable or disable the entire plugin.
-
Instagram Token → Authenticates to Instagram for generating a secure token used for communicating and fetching the media.
Before you can login, you need to follow the steps from the Instagram: Getting Started Guide below. Only after you have an ID and Secret and you have saved the configuration will you be able to proceed with logging in.
Once successfully logged in a token followed by "Valid Token" will appear. -
Always Include Assets → When disabled, you will be responsible for including the CSS and JS files from the twig templates. By default this happens from the plugin class.
Instagram: Getting Started Guide
Because this plugin utilizes OAuth authentication via the Basic Display API, you need to install and use this plugin on a Grav installation with an externally accessible URL. http://localhost will not work because the API uses a callback, and won't be able to reach this from the internet. You will need to use a public URL or IP and perhaps even port-forwarding for your local environment. SSL via a https:// URL is also required since Basic Display API does not allow saving URLs that are not SSL.
In order to make use of this plugin, you first need to create a valid Instagram Application utilizing the new Basic Display API process. This guide uses the official Facebook guide as reference.
Create a Facebook App
Go to developers.facebook.com and register an account if you have not already done so already. Click My Apps, create a new app and choose the Consumer or None app type.
Once you have created the app and are in the App Dashboard, navigate to Settings > Basic in the left sidebar, scroll to the bottom of page, and click Add Platform.
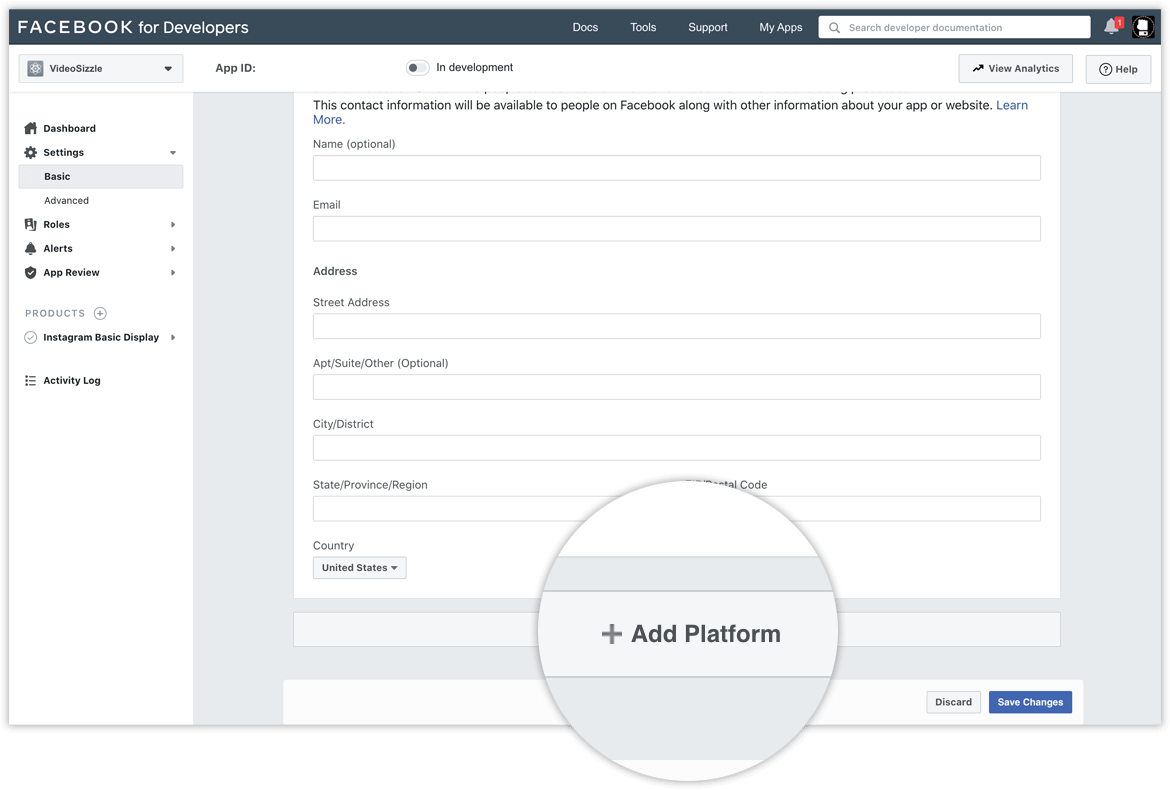
Choose Website, add your website’s URL, and save your changes. You can change the platform later if you wish, but for this tutorial, use Website, then click Save Changes.

Configure Instagram Basic Display
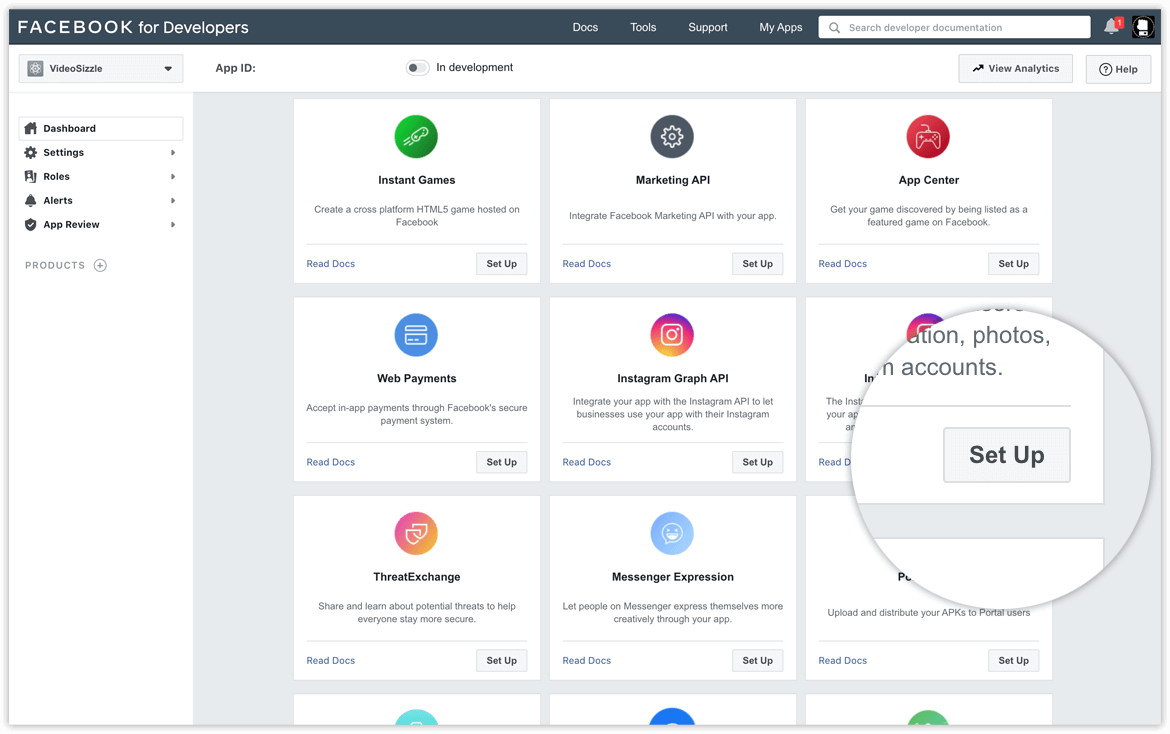
On the left sidebar, click the icon next to Products, locate the Instagram Basic Display product in the list, and click Set Up to add it to your app.
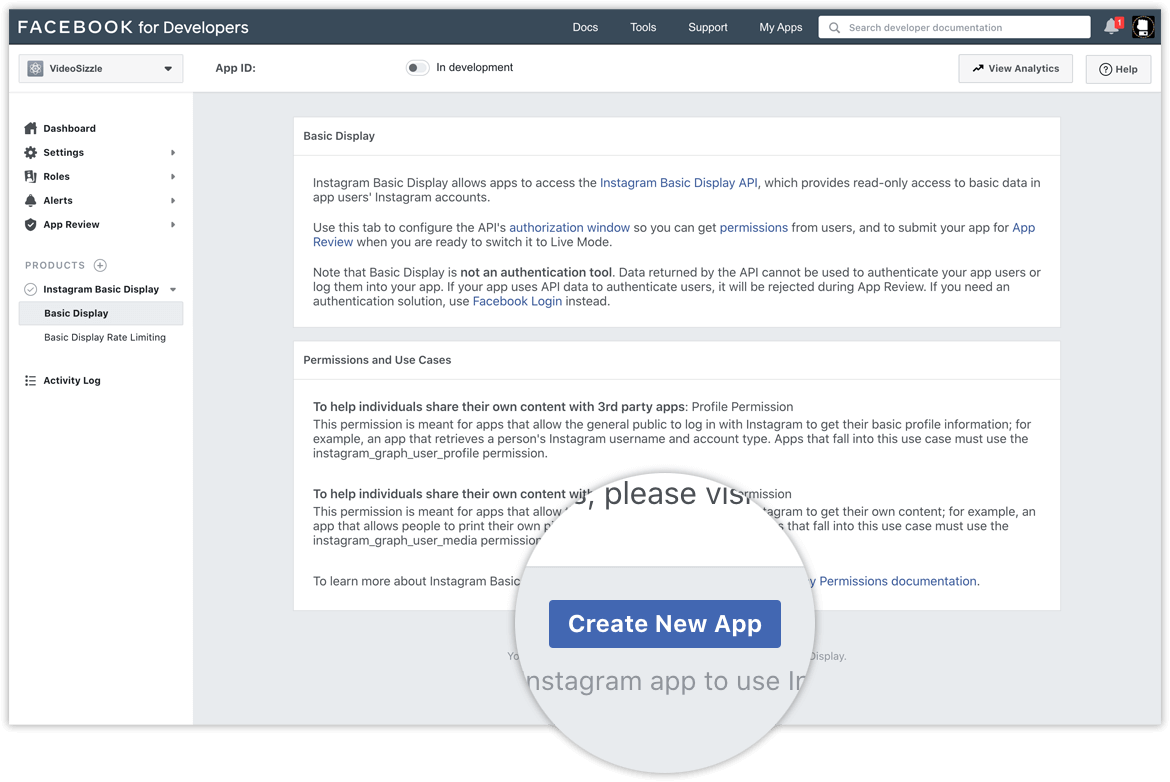
Scroll to the bottom of the page and click Create New App.
In the modal form that appears, ensure the Display Name is already set to the Facebook app name you created in the earlier step. Click Create New App on this form.
In the Basic Display configuration that appears set the following information:
Display Name
Enter the name of the Facebook app you just created.
Valid OAuth Redirect URIs
In the Grav Admin, navigation to Plugins > Instagram Feed and copy the Instagram Redirect URI that is already autogenerated for you.

Paste this value into the Valid OAuth Redirect URIs field in the Client OAuth Settings section on the Facebook Developer > Basic Display form.

Application ID & Application Secret
On the Basic Display configuration page, copy the Instagram App ID and Instagram App Secret from the top of the page into the Grav plugin configuration. In the Grav Admin, navigate to Plugins > Instagram Feed and enter both the Application ID and Application Secret.
Click Save in the Grav Admin to save the plugin configuration.


Deauthorize Callback URL
Enter your website URL into this field.
Data Deletion Request Callback URL
Enter your website URL into this field.
Click Save Changes to save the changes so far.
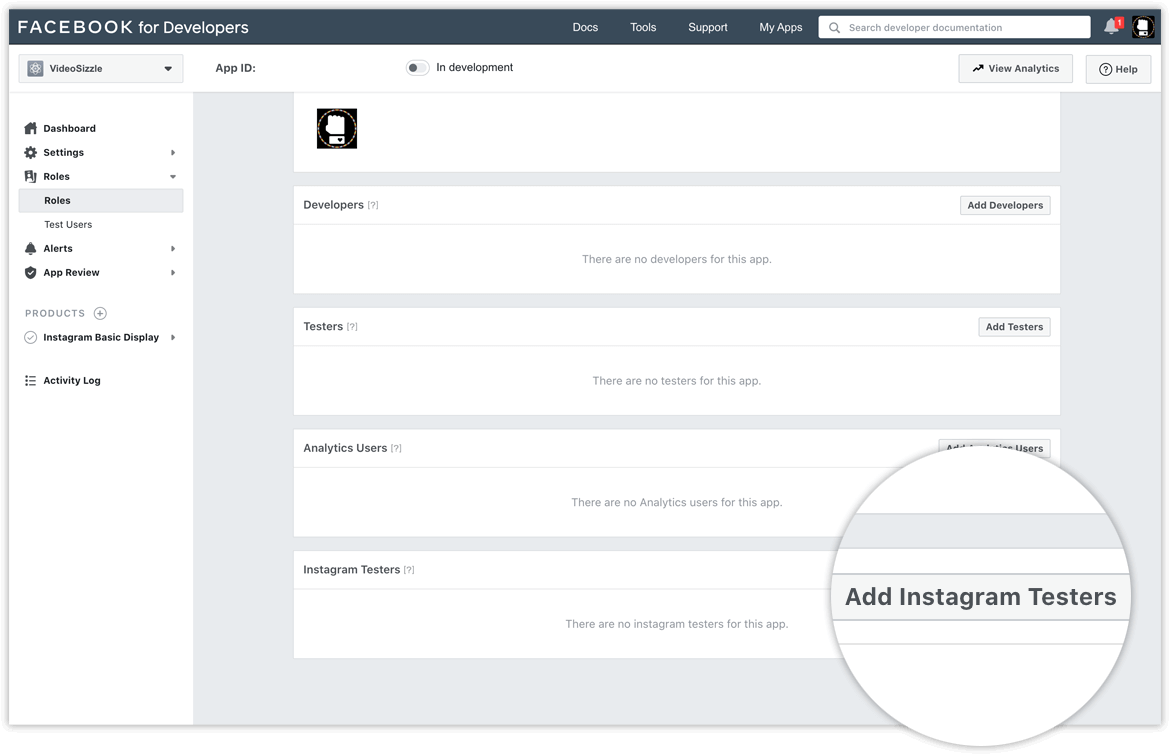
Add an Instagram Test User
In the left sidebar, navigate to Roles > Roles and scroll down to the Instagram Testers section. Click Add Instagram Testers and enter your Instagram account’s username and send the invitation.
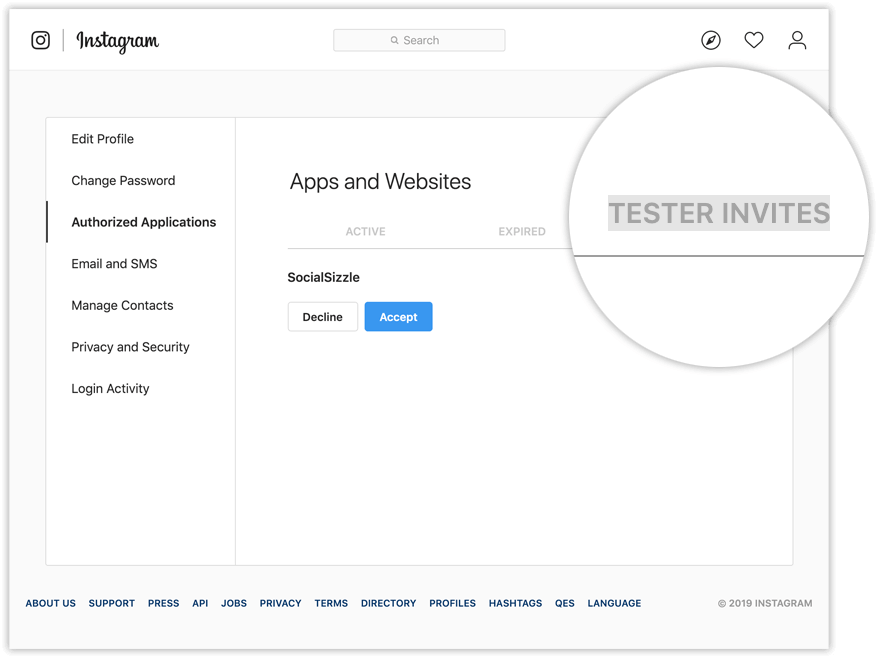
Open a new web browser, go to https://www.instagram.com and sign into your Instagram account that you just invited. Navigate to (Profile Icon) > Edit Profile > Apps and Websites > Tester Invites and accept the invitation.
Your Instagram account is now eligible to be accessed by your Facebook app while it is in Development Mode.
Login from Grav Admin
In the Grav Admin, navigate to Plugins > Instagram Feed, and click the Login to Instagram button. It should open a new tab, where you will be prompted with an Instagram OAuth Authorization.
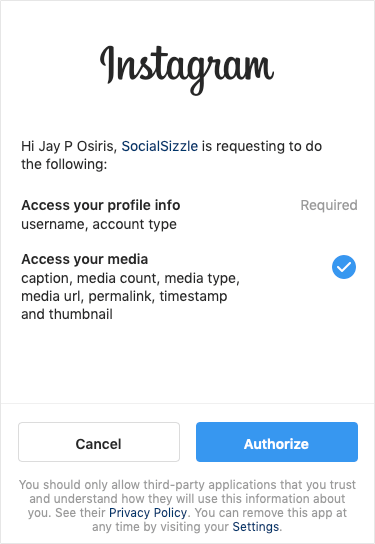
Authenticate your Instagram test user by signing into the Authorization Window, then click Authorize to grant your app access to your profile data. If successful, you should see a page labeled Instagram site token saved with a long token. You can ignore this and close the tab. Grav has now saved this token so you won't need to authorize every time.
If you reload the Instagram Feed plugin page, above the Login to Instagram button, there should be a Valid Token badge displayed next to a summary of the token. You are now all set. 👍
Testing
To ensure everything is functioning correctly and you are pulling back media for your user, you can simply create a page with the instagram-test.md name. This page will then render with some debug information (user profile data, current token, and sample media).
Functionality & Customization
The Instagram images are downloaded from Instagram and cached locally on the Grav instance. These images are then wrapped in a Grav Media object to allow you to iterate over them and perform standard Grav media functions.
A basic example of simply iterating over the instagram media and displaying a 300px x 200px thumb would be:
{% for image in instagram.getInstagramMedia %}
    <img style="display: inline-block;" src="{{ image.cropZoom(300, 200).url }}" />
{% endfor %}
A more complex example can be seen in the included templates/partials/instagram/display-media.html.twig template:
<div class="flex flex-wrap -mr-2">
  {% for image in instagram.getInstagramMedia|slice(0,12) %}
    <div class="w-1/3">
      <div class="mr-4 mb-4">
        <a href="{{ image.meta.permalink }}" target="_blank">
          <img class="block rounded-md overflow-hidden" src="{{ image.cropZoom(600, 600).url }}" />
        </a>
        <div class="block text-center opacity-75 px-4">{{ image.meta.caption }}</div>
      </div>
    </div>
  {% endfor %}
</div>
In this example we limit ourselves to the latest 12 images, and make use of the meta data generated from Instagram to access the permalink and caption.
The second boolean argument in getInstagramMedia() method controls if the local data should be refreshed.
Token Refresh
The Instagram Basic Display API utilizes 60 day long-lived tokens. However, to have your token function beyond 60 days without having to re-login to get a new token, you can simply refresh the current token. This can be done via the CLI:
bin/plugin instagram-feed refresh-tokenOr you can enable the Grav Scheduler job provide to automate it however you like.
bin/grav scheduler -jFor more information.
Credits
This plugin is built on top of the Instagram Basic Display PHP API library by espresso-dev